
So soldier, you want to go out exploring on your adventures? First, listen here to your commander and get a few tips on how to set up your own server in this Quick-Start Guide.
This guide makes a few assumptions:
- You know what IP addresses and port numbers are;
- You know how to work with your router or ISP to do port-forwarding; or that you are working on a remote server which automatically does port-forwarding;
- You understand what “Go to ‘steamapps/common/Battle Grounds III’ and open LaunchServer.bat for editing” means;
- You are working on a Windows machine.
Get the Server Software
The server software is included with every download of BG3 through Steam. The server software is lightweight and requires much of the rest of BG3 to run, so it makes sense to include them together.
To download BG3 (and the server software) without having to download the Steam client, download Steam’s command-line tool, SteamCMD.
After you run SteamCMD and wait for it to update itself, download and install BG3 by running the command:
app_update 1057700
Where 1057700 is BG3’s AppID. Note: in some cases, in may be necessary to first use the “login” command to log in to an account which has already downloaded BG3 through a Steam client.
The game may take serveral minutes to an hour to download. Relative to SteamCMD, BG3 should now be downloaded in "steamapps/common/Battle Grounds III". Go into that folder.
Change the Server Name
Giving your server its own name helps make it identifiable to others. Open "Battle Grounds III/bg3/cfg/server.cfg" in a text editor such as notepad and edit the hostname variable in order to give your server its own name. Do not remove the quotes.
Add Users as Server Admins
Battle Grounds III does not support the SourceMod plugin, but it does have its own system for allowing specific users to remotely use commands on the server. Performing this step will let you run commands while you’re playing the game.
-
- For each user who wishes to be an admin, acquire their SteamID. Visit steamid.co and find the SteamID of a user by entering the URL to their Steam profile. You want the SteamID that looks like STEAM_1:X:XXXXXX
- WARNING! MOST OTHER “FIND YOUR STEAMID” SERVICES ARE WRONG! They ignore the public documentation. Other service’s results will (ignoring cases of special-use SteamIDs) erroneously output the SteamID as STEAM_0:X:XXXXXX instead of the correct STEAM_1:X:XXXXXX.
- Open
"Battle Grounds III/bg3/cfg/permissions.res"for editing. Where it says “List SteamIDs here, each followed by a 1”, do that. Any line that begins with // is ignored. Just enter the SteamIDs each followed by a 1. - It’s a good idea to label each SteamID with the name of user it belongs to. In the end, it should look something like this:
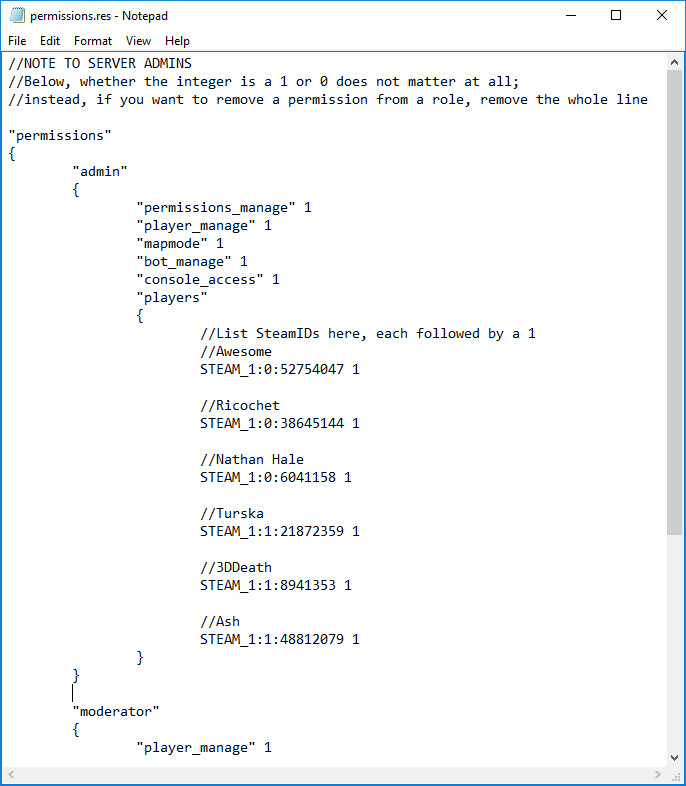
Any player who has their SteamID there, followed by a 1, will have admin powers.
NOTE: The game server must restart for changes to this file to take effect.
To learn more about what admin powers are available and how to use them, look at this page.
Edit Your Launch Script
It’s almost time to run your server! Open "Battle Grounds III/LaunchServer.bat" for editing. The part you need to edit is where you see +ip XXX.XXX.XXX.XXX. Replace that placeholder IP address with the IP address of your server. You may also wish to replace value of maxplayers in order to change how many players can connect to your server.
Increasing the tickrate of your server, assuming it has the necessary bandwidth and computing power, can improve players’ experience. The default tickrate is 66. Other common options are 100 and 128. For example, to set a custom tickrate of 128, add -tickrate 128 to the server launch script, after the server/srcds.exe. As a full example, the Official Frankfurt server’s launch script is server\srcds.exe -tickrate 100 -steam -console -game "..\bg3" +ip 185.107.96.228 -port 27015 +map sq +maxplayers 128 -autoupdate. Then what must be done is to edit the sv_maxupdaterate setting in "Battle Grounds III/bg3/cfg/server.cfg". The new setting should be equal to your custom tickrate. To verify that it worked correctly, join your server as a player and check the average packet/s being received from the server with net_graph 1.
Run Your Server
Run your server by running LaunchServerRecovering.bat. This little script simply runs LaunchServer.bat and ensures that if your server crashes, the server will start back up again. This prevents you from having to re-run the server manually.
Congratulations, your server is running! Ensure that you’ve port-forwarded with your router, ISP, and/or hosting service so that other players are able to connect. Double-check that your server appears in the game’s server browser (and it’s not only in the LAN section) and that you are able to connect. Double-check that you have your admin roles set up correctly by running some commands. For example, connect to your server and try typing !clip @me into the game chat.
Adding Bots
BG3 has a new, custom bot AI. Bots are useful for filling up servers and giving players a chance to play a big game when few others are playing.
The easiest way to add bots is to run the command bot_minplayers_mode 3 in the server console, or (assuming you’re an admin) !rc bot_minplayers_mode 3 in the game chat. This command turns on the bot system and ensures that bots will be added in appropriate numbers to the maps that support them.
If you wish to avoid typing that command each time, you can put the bot_minplayers_mode 3 command into your server.cfg from before. To remove bots, run the bot_kick_all command.
That’s all folks! If you run into any issues, do not hesitate to submit a bug report or otherwise email community@battlegrounds3.com .

Hi everyone, we are a hosting company, we now provide rentable battle grounds 3 dedicated server hosting, you can rent one from us here: https://citadelservers.com/en-us/game-servers/battle-grounds-3-game-hosting
Get your own server up today!
LikeLike
Worked fine, community players can join, except me, the server host. Maybe you guys can help out with the issue.
I get an error message, connection closed after 4 retries.
LikeLike
Thank you for this article, very useful.
LikeLike
For some reason going into the server.cfg file and adding “bot_minplayers_mode 3” doesn’t work. Is there something that I missed it was something changed about how to do this?
LikeLike
Can you make a dumbed down version for those of us who cant think?
LikeLike
Any idea how to create a dedicated server and play on localhost? I can see the server but I get an error “time out after 4 retries” Other people on the LAN can connect and play. I am really getting tired of being just an admin and changing up gravity and number of bots now. I want to play too!
LikeLike
It says that it “Couldn’t Allocate any Server IP Port”
LikeLike
can you pls make a video tutorial that way is much easier
LikeLike